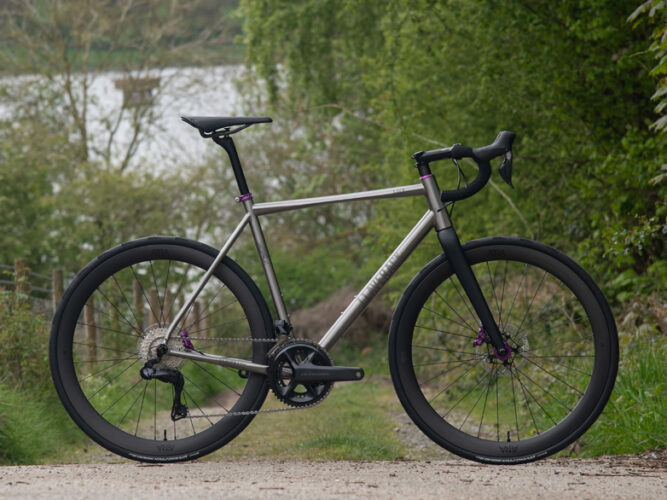
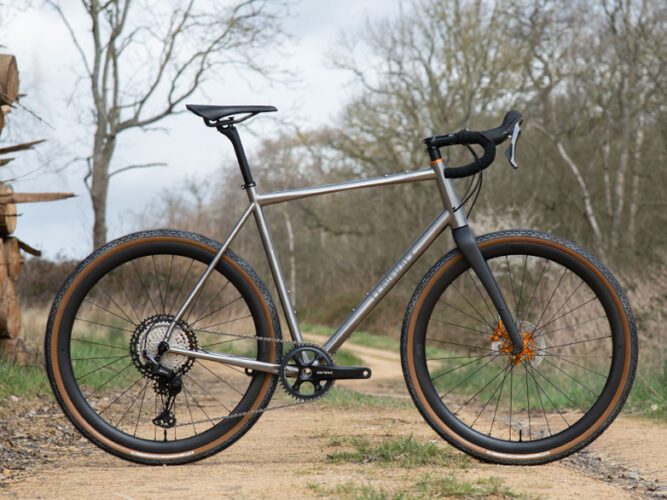
A geometry that breeds confidence on testing terrain and encourages you to explore more.
The result: A refined, unflinchingly capable and stable all terrain gravel bike for explorers that can be tailored to suit adventures great or small. A frame that provides confidence inspiring handling and aesthetic beauty in equal measure.


TTHE GRiT has been a long time in development,” said designer Oliver Laverack. “We have been determined throughout the design and testing process that this should be a no compromise, aesthetically beautiful gravel adventure bike that will inspire confidence no matter how gnarly the terrain. We also wanted to set our new gravel bike clearly apart from our extremely capable J.ACK, which has abundant off-road capability, but is more road and rough road focussed.”
GRAVEL ADVENTURE GEOMETRY & COCKPIT
Up front, the GRiT fork offers ample tyre and mud clearance and features a longer rake, increasing the gap between your shoes and the front tyre, which is important on slower technical terrain. Longer chainstays, combined with a meticulous bike fit, place the rider’s weight further back for increased traction over loose terrain. Both the longer fork rake and longer chainstays also increase the stability of the bike over rough sections at speed.
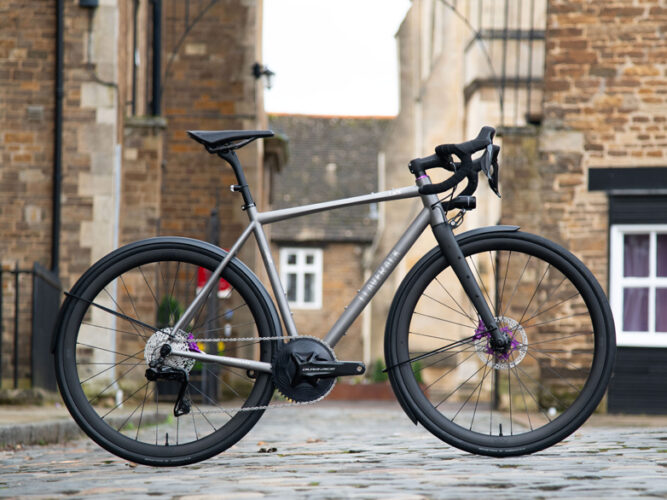
All models feature wider flared handlebars and shorter stems to take the rider’s weight off the front of the bike and keep handling responsive and light.
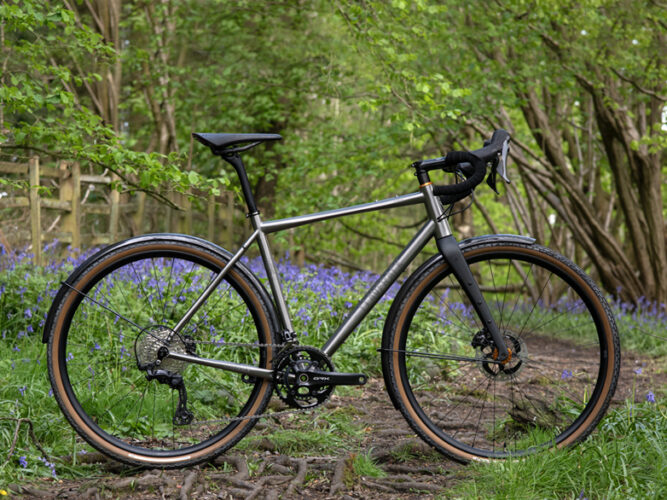
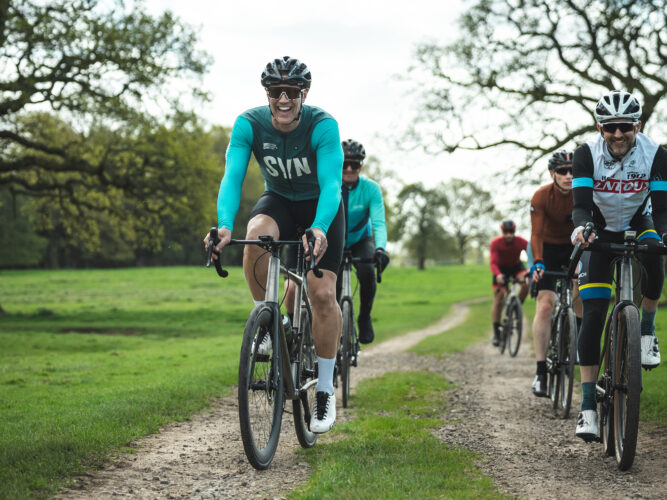
This bike can be configured in so many different ways, depending on the type and size of the adventure. Build it up with a full complement of frame luggage and tackle a trans-continental adventure, or simply run two bottles and head out on your local trails, you decide. The GRiT will take any adventure in its stride, be it big or small.
“The ride characteristics of the GRiT have surpassed even our own expectations and combined with super wide tyre clearances, that will allow for up to 50mm 650B tyres and 48mm 700C tyres, this bike is an unstoppable adventure machine,” said Oliver.
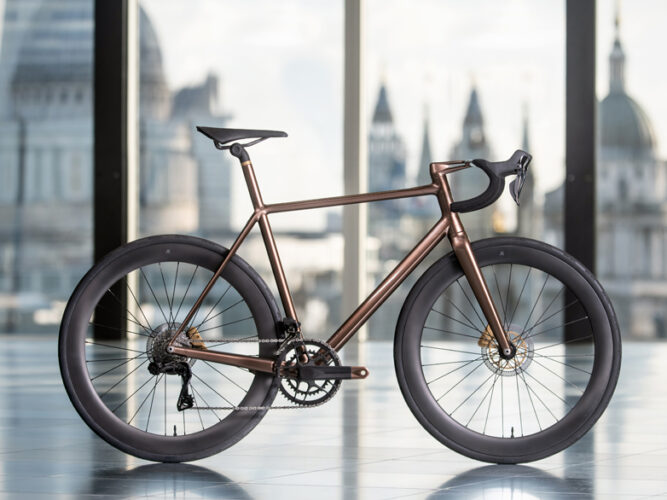
“In our eyes, titanium is the best material in the world for a gravel adventure bike; it’s the ultimate metal with mettle. The rough and tumble nature of gravel and off-road riding means riders will push their limits and need a material that will stand up to repeatedly being ridden hard”.

Shimano GRX 1x: mechanical from £4750 // Di2 from £5490
Shimano GRX 2x: mechanical from £4950 // Di2 from £5690
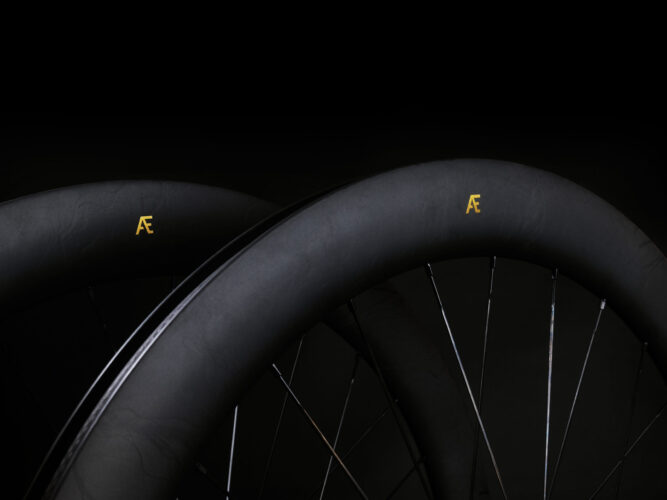
Your choice of ÆRA gravel wheels, alloy or carbon
Brooks Cambium C13 saddle
Hope threaded bottom bracket
Pro Discover bars & stem with ÆRA carbon seatpost

SRAM Force AXS eTap 1x with Eagle rear mech: from £6190
Your choice of ÆRA gravel wheels, alloy or carbon
Brooks Cambium C13 saddle
Hope threaded bottom bracket
Pro Discover bars & stem with ÆRA carbon seatpost

Unsightly dynamo cables are no more with our internally routed dynamo cable option.

Reliability and simplicity are king where bottom brackets are concerned and for this reason we recommend threaded bottom bracket shells.

Gear and brake cables are routed internally to protect them from the elements and ensuring smooth shifting and braking.

A wider head tube where the fork meets the frame increases the stiffness in that area, reducing flex and improving steering precision.

Beautifully integrated ‘Streamline‘ head tube and/or bottom bracket that allow all cables to be hidden and protected inside the frame.

Custom geometry to ensure a bike that has been made to your measurements to the millimeter.

Run up to 50mm tyres with 650b wheels or 48mm tyres with 700C wheels.

Add even more versatility by opting for mudguard and rack mounts and open the door to winter riding in comfort or multi-day rides with a pannier for the overnight stay.
- Threaded BSA (English) or T47 bottom bracket, other options available on request.
- Cable routing specific to your groupset
- Internal brake and gear cable routing
- Tapered head tube
- 50mm tyre clearance with 650b wheels
- 48mm tyre clearance with 700C wheels
- Compliant yet durable 3Al-2.5V double-butted titanium tubing
- 6Al-4V head tube, bottom bracket and dropouts
- 12mm Thru-axle as standard
- Timeless bead blasted graphics
- Elegant frame design
- The first 50 commemorative frames will be numbered
- Rack and/or mudguard mounts
- 3rd bottle cage mount
- Three head badge designs
- Internal dynamo cable routing
- Handlebar width
- Crank arm length
- Chainset ratio
- Stem length
- Cassette ratio
- Seatpost diameter 27.2mm or 31.6mm
- Pavé stainless steel bottle cages bolts
- Bike fit with bespoke geometry from £350
- ÆRA Gravel Adventure Dynamo Disc fork plus £65
- ÆRA Gravel Adventure Dynamo Anything Mounts Disc fork plus £85
- Streamline head tube plus £175
- Streamline bottom bracket plus £150
- Personalised graphic plus £180
-
Pavé bead blasted frame finish plus £295
-
Bespoke Painting options from £845
- Additional lugs for strapless frame luggage up to £195
- Pavé titanium bottle cage bolts £5 each
- Titanium bottle cages plus £40 each

Where possible we recommend a test ride and/or bike fit at our showroom in Oakham, allowing us to make the best recommendations.
As a guide, we’d suggest:
48cm: 152 – 158cm | 4′ 9″ – 5′ 2″
50cm: 156 – 164cm | 5′ 1″ – 5′ 4″
52cm: 162 – 170cm | 5′ 3″ – 5′ 7″
54cm: 168 – 178cm | 5′ 6″ – 5′ 10″
56cm: 174 – 184cm | 5′ 8″ – 6′ 0″
58cm: 180 – 188cm | 5′ 11″ – 6′ 2″
60cm: 186 – 194cm | 6′ 1″ – 6′ 4″
62cm: 192 – 200cm | 6′ 3″ – 6′ 6″
If you are unsure about which size is right for you, please don’t hesitate to get in touch.
| S – Stack | 538 |
| R – Reach | 355 |
| HT – Head Tube Length | 115 |
| HA – Head Angle | 70.5˚ |
| AC – Fork Axle to Crown | 395 |
| FO – Fork Offset | 50 |
| TTE - Top Tube Effective | 519.5 |
| TT - Top Tube Actual | 499.3 |
| ST – Seat Tube Length | 470 |
| SA – Seat Tube Angle | 73˚ |
| CS – Chain Stay Length | 435 |
| WB – Wheelbase | 1001.5 |
| FC – Front Centre Distance | 577.3 |
| BBD – Bottom Bracket Drop | 73 |
| Rear axle spacing | 142 |
| Typical stem length | 80 |
| Typical handlebar width | 380 or 400 |
| Typical crank length | 165 |
| Maximum Tyre Clearance (700C) | 48mm |
| Maximum Tyre Clearance (650b) | 50mm |
| Maximum Tyre Clearance (700C) with mudguards | 45mm |
| Maximum Tyre Clearance (650b) with mudguards | 48mm |
| Mudguard Mounts | Optional |
| Rack Mounts | Optional |
| 3rd Bottle Cage Mounts | Optional |
| S – Stack | 549.3 |
| R – Reach | 361 |
| HT – Head Tube Length | 125 |
| HA – Head Angle | 71˚ |
| AC – Fork Axle to Crown | 395 |
| FO – Fork Offset | 50 |
| TTE - Top Tube Effective | 529.0 |
| TT - Top Tube Actual | 509.0 |
| ST – Seat Tube Length | 490 |
| SA – Seat Tube Angle | 73˚ |
| CS – Chain Stay Length | 435 |
| WB – Wheelbase | 1006.7 |
| FC – Front Centre Distance | 582.5 |
| BBD – Bottom Bracket Drop | 73 |
| Rear axle spacing | 142 |
| Typical stem length | 80 |
| Typical handlebar width | 400 |
| Typical crank length | 165 |
| Maximum Tyre Clearance (700C) | 48mm |
| Maximum Tyre Clearance (650b) | 50mm |
| Maximum Tyre Clearance (700C) with mudguards | 45mm |
| Maximum Tyre Clearance (650b) with mudguards | 48mm |
| Mudguard Mounts | Optional |
| Rack Mounts | Optional |
| 3rd Bottle Cage Mounts | Optional |
| S – Stack | 570.2 |
| R – Reach | 367 |
| HT – Head Tube Length | 145 |
| HA – Head Angle | 71.5˚ |
| AC – Fork Axle to Crown | 395 |
| FO – Fork Offset | 50 |
| TTE - Top Tube Effective | 541.3 |
| TT - Top Tube Actual | 520.6 |
| ST – Seat Tube Length | 510 |
| SA – Seat Tube Angle | 73˚ |
| CS – Chain Stay Length | 435 |
| WB – Wheelbase | 1014.9 |
| FC – Front Centre Distance | 590.6 |
| BBD – Bottom Bracket Drop | 73 |
| Rear axle spacing | 142 |
| Typical stem length | 80 |
| Typical handlebar width | 400 or 420 |
| Typical crank length | 170 |
| Maximum Tyre Clearance (700C) | 48mm |
| Maximum Tyre Clearance (650b) | 50mm |
| Maximum Tyre Clearance (700C) with mudguards | 45mm |
| Maximum Tyre Clearance (650b) with mudguards | 48mm |
| Mudguard Mounts | Optional |
| Rack Mounts | Optional |
| 3rd Bottle Cage Mounts | Optional |
| S – Stack | 589.1 |
| R – Reach | 373 |
| HT – Head Tube Length | 165 |
| HA – Head Angle | 71.5˚ |
| AC – Fork Axle to Crown | 395 |
| FO – Fork Offset | 50 |
| TTE - Top Tube Effective | 553.1 |
| TT - Top Tube Actual | 532.2 |
| ST – Seat Tube Length | 530 |
| SA – Seat Tube Angle | 73˚ |
| CS – Chain Stay Length | 435 |
| WB – Wheelbase | 1027.3 |
| FC – Front Centre Distance | 602.9 |
| BBD – Bottom Bracket Drop | 73 |
| Rear axle spacing | 142 |
| Typical stem length | 90 |
| Typical handlebar width | 420 |
| Typical crank length | 172.5 |
| Maximum Tyre Clearance (700C) | 48mm |
| Maximum Tyre Clearance (650b) | 50mm |
| Maximum Tyre Clearance (700C) with mudguards | 45mm |
| Maximum Tyre Clearance (650b) with mudguards | 48mm |
| Mudguard Mounts | Optional |
| Rack Mounts | Optional |
| 3rd Bottle Cage Mounts | Optional |
| S – Stack | 598.6 |
| R – Reach | 379 |
| HT – Head Tube Length | 175 |
| HA – Head Angle | 71.5˚ |
| AC – Fork Axle to Crown | 395 |
| FO – Fork Offset | 50 |
| TTE - Top Tube Effective | 562.0 |
| TT - Top Tube Actual | 542.1 |
| ST – Seat Tube Length | 550 |
| SA – Seat Tube Angle | 73˚ |
| CS – Chain Stay Length | 435 |
| WB – Wheelbase | 1032.7 |
| FC – Front Centre Distance | 612.0 |
| BBD – Bottom Bracket Drop | 73 |
| Rear axle spacing | 142 |
| Typical stem length | 90 |
| Typical handlebar width | 420 |
| Typical crank length | 172.5 |
| Maximum Tyre Clearance (700C) | 48mm |
| Maximum Tyre Clearance (650b) | 50mm |
| Maximum Tyre Clearance (700C) with mudguards | 45mm |
| Maximum Tyre Clearance (650b) with mudguards | 48mm |
| Mudguard Mounts | Optional |
| Rack Mounts | Optional |
| 3rd Bottle Cage Mounts | Optional |
| S – Stack | 614.9 |
| R – Reach | 385 |
| HT – Head Tube Length | 190 |
| HA – Head Angle | 72˚ |
| AC – Fork Axle to Crown | 395 |
| FO – Fork Offset | 50 |
| TTE - Top Tube Effective | 573.0 |
| TT - Top Tube Actual | 553.0 |
| ST – Seat Tube Length | 570 |
| SA – Seat Tube Angle | 73˚ |
| CS – Chain Stay Length | 435 |
| WB – Wheelbase | 1042.5 |
| FC – Front Centre Distance | 618.0 |
| BBD – Bottom Bracket Drop | 73 |
| Rear axle spacing | 142 |
| Typical stem length | 90 |
| Typical handlebar width | 420 or 440 |
| Typical crank length | 175 |
| Maximum Tyre Clearance (700C) | 48mm |
| Maximum Tyre Clearance (650b) | 50mm |
| Maximum Tyre Clearance (700C) with mudguards | 45mm |
| Maximum Tyre Clearance (650b) with mudguards | 48mm |
| Mudguard Mounts | Optional |
| Rack Mounts | Optional |
| 3rd Bottle Cage Mounts | Optional |
| S – Stack | 629.1 |
| R – Reach | 391 |
| HT – Head Tube Length | 205 |
| HA – Head Angle | 72˚ |
| AC – Fork Axle to Crown | 395 |
| FO – Fork Offset | 50 |
| TTE - Top Tube Effective | 583.4 |
| TT - Top Tube Actual | 564.0 |
| ST – Seat Tube Length | 590 |
| SA – Seat Tube Angle | 73˚ |
| CS – Chain Stay Length | 435 |
| WB – Wheelbase | 1053.1 |
| FC – Front Centre Distance | 628.5 |
| BBD – Bottom Bracket Drop | 73 |
| Rear axle spacing | 142 |
| Typical stem length | 100 |
| Typical handlebar width | 440 |
| Typical crank length | 175 |
| Maximum Tyre Clearance (700C) | 48mm |
| Maximum Tyre Clearance (650b) | 50mm |
| Maximum Tyre Clearance (700C) with mudguards | 45mm |
| Maximum Tyre Clearance (650b) with mudguards | 48mm |
| Mudguard Mounts | Optional |
| Rack Mounts | Optional |
| 3rd Bottle Cage Mounts | Optional |
| S – Stack | 640.7 |
| R – Reach | 397 |
| HT – Head Tube Length | 215 |
| HA – Head Angle | 72.5˚ |
| AC – Fork Axle to Crown | 395 |
| FO – Fork Offset | 50 |
| TTE - Top Tube Effective | 592.9 |
| TT - Top Tube Actual | 574.3 |
| ST – Seat Tube Length | 610 |
| SA – Seat Tube Angle | 73˚ |
| CS – Chain Stay Length | 435 |
| WB – Wheelbase | 1057.3 |
| FC – Front Centre Distance | 632.6 |
| BBD – Bottom Bracket Drop | 73 |
| Rear axle spacing | 142 |
| Typical stem length | 100 |
| Typical handlebar width | 440 |
| Typical crank length | 177.5 |
| Maximum Tyre Clearance (700C) | 48mm |
| Maximum Tyre Clearance (650b) | 50mm |
| Maximum Tyre Clearance (700C) with mudguards | 45mm |
| Maximum Tyre Clearance (650b) with mudguards | 48mm |
| Mudguard Mounts | Optional |
| Rack Mounts | Optional |
| 3rd Bottle Cage Mounts | Optional |
All measurements in millimetres unless otherwise specified